Thursday, January 1, 2026

Prismatic "Love Ya!"

    This prismatic paper looks totally different when you change the angle or lighting!
 
Here's me getting an early start on Valentine's Day Cards! 

I'm entering this card into three challenges:
Lawn Fawnatics Challenge 211 – Sparkle & Shine
Simon Says Stamp Monday Challenge: Sparkle and Shine
and Simon Says Stamp Wednesday Challenge: Add A Sentiment! featuring Memory Box Products.
 
Materials 
• Lawn Fawn Dies: Candy Hearts, Giant Outlined Love Ya, and Polka Heart Backdrop: Landscape.
• The Paper Studio Cards: Red Textured 5"x7", Recollections Holographic Foil Cardstock Paper, and Enchanted Forest Luxury Matt Mirror Card in Pink Fizz.
• Art Glitter Dries Clear Adhesive.

Other Materials
White paper; paper trimmer; Sizzex Big Shot; craft tape; tweezers; and Lawn Fawn Metal Adapter Plate.

Instructions
Diecut the backdrop and one set of candy hearts from the prismatic paper, Love Ya from the white paper and the pink paper, and another set of candy hearts from the pink paper. Make sure you diecut an extra plain heart from the pink for the second small heart background. 

Note: keep track of the placement of your inside pieces for easier assembly!

Start by gluing the backdrop to the card base. Add the Love Ya outline and fill in letters, hearts, and exclamation point with white diecut counterparts. Adhere bases to small hearts and glue result onto backdrop. Enjoy your super shiny card!

See how different the same card is under other lighting?

Saturday, February 1, 2025

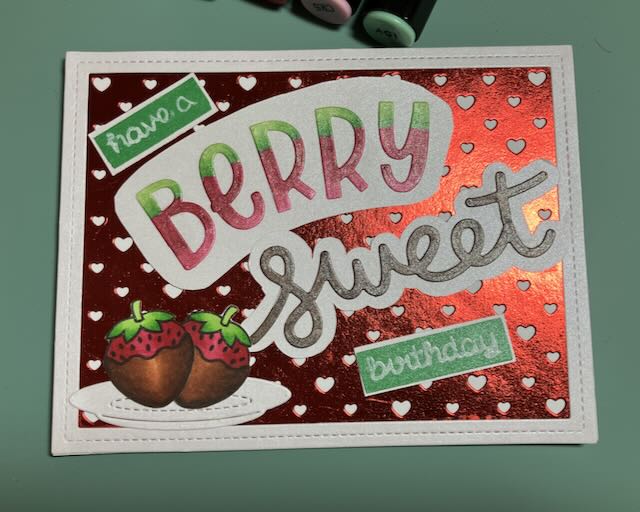
Berry Sweet Birthday


Yum! Happy Birthday!


I'm entering this card into three challenges:
Lawn Fawnatics Challenge 189 – Lots of Heart
Simon Says Stamp: Have a Heart
and Simon Says: Anything Goes featuring Spellbinders.

 
Materials

Lawn Fawn Stamps: Baked with Love and Sweet Strawberry
Lawn Fawn Dies: Henry's ABCs, Polka Heart Backdrop: Landscape, Scripty Sweet, Stitched Teacup, and Stitched Rectangle Frames
Recollections Red Foil Cardstock, Shimmer Christmas Neutrals (white), and Holiday Shimmer (green)
 
Copic Colorless Blender
Spectrum Noir Markers in:
  • TN4, TN5, TN7, and EB5
  • CR5 and DR3
  • AG1, AG2, and AG3
Lawn Fawndamentals: glue and metal adaptor plate
Lawn Fawn Jet Black Ink Pad
ColorBox pigment in Frost White
Recollections Detail Embossing Power in Clear

Other Materials
card: A2 size, white; Neenah 80lb white cardstock; scissors; heat-resistant craft mat; paper trimmer; embossing heat tool; Brother ScanNCut; Sizzex Big Shot, acrylic stamping tool; ek tools powder; craft tape;  and Simon Says Stamp mini grabbing hands

Instructions
Stamp plain white paper with the chocolate covered strawberries. Cut out and color with markers as given above. Use dies on the white shimmer paper for "berry" and "sweet" as well as the teacup plate and the outside border. Also die cut the background from the red foil paper.

Color the berry and sweet with the same shades of color as the strawberries. (Because of the shimmer paper, they will look a different shade.) Stamp "have a" and "birthday" onto green shimmer paper and emboss with clear powder, then cut to size. Glue all of the words onto white shimmer paper and cut out. Adhere the background and then the border to the card. Add the words from top to bottom, and finish with a plateful of chocolate-covered strawberries! Yum!


Monday, February 14, 2022

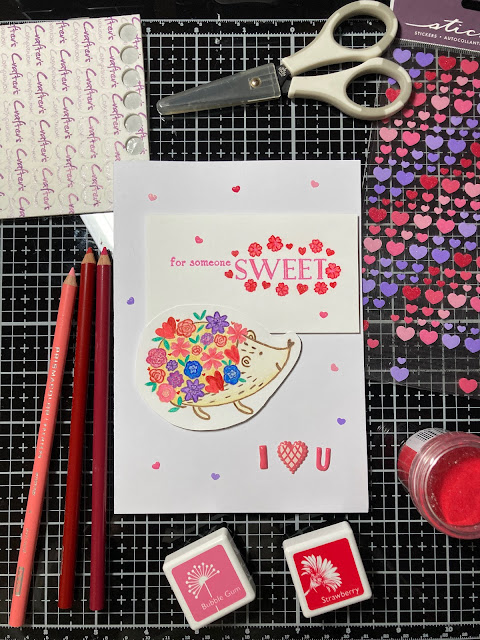
Valentine's Day!

Happy Valentine's Day 2022!

To a special person on Valentine's Day 2022. Much love. 

My craft room revamp is almost done, and it's close enough that I could start making cards again. For such a basic card this took longer than I expected to make. I'm out of the groove of card-making I guess. Time for me to jump back in.

I'm not entering this card into any challenges.

Materials
Hero Arts Loving Messages Clear Stamps
MSE! (My Sentiments Exactly) M122 Back of Card Set
Penny Black heart hedgies Clear Stamps
Simon Says Stamp! SSS2-2111 Be My Valentine

Derwent Burnisher & Blender
Prismacolor Colored Pencils in:
  • 902 ultramarine
  • 906 copenhagen blue
  • 914 cream
  • 924 crimson red
  • 926 carmine red
  • 928 blush pink
  • 929 pink
  • 930 magenta
  • 932 violet 
  • 940 sand
  • 946 dark brown
  • 947 dark umber
  • 956 lilac 
  • 995 mulberry
  • 1006 parrot green
  • 1008 parma violet
Lawn Fawn Clear Ink Pad
Hero Arts Stamp Pads in Bubble Gum and Strawberry
Ranger Distress Ink in Antique Linen
Ranger Wendy Vecchi Embossing Powder in Red Geranium 
Martha Stewart Crafts Valentine's Foam Icon Stickers
Sticko Purple N Pink Hearts Stickers
Crafter's Companion Pop Dots

Other Materials
card: A7 size, white; white paper suitable for colored pencils; scissors; heat-resistant craft mat; paper trimmer; embossing heat tool; double sided adhesive tape; and acrylic stamping tool

Instructions
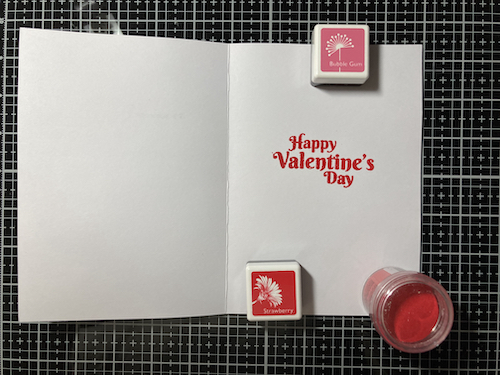
Stamp the inside with clear ink and the "Happy Valentine's Day" saying from the SSS set. Add Red Geranium embossing powder, tap off excess, and heat with heat tool until melted. Stamp the back with the "made just for you" from the MSE! stamp set in Strawberry Ink. On a separate sheet of paper stamp "for someone SWEET" from the heart hedgies set in Bubble Gum Ink, and stamp the flower hedgehog in Antique Linen Ink.

Color in the flowers and hedgehog using colored pencils. Use the paper trimmer to cut the sentiment and scissors to fussy-cut the hedgehog. Adhere the sentiment with pop dots. Add a little double sided adhesive to the top of the hedgehog and pop dots to the rest of the body. Position just over the edge of the sentiment before adhering. Add some heart sticks and an I <3 U. Don't forget to sign your card before giving it to that special someone! (Don't worry, I signed it after taking pictures.)
 
The finished card!

The inside of the card.
The back.

Tuesday, March 26, 2019

Racing birthday dog!

Racing dog headed to the party!
I was looking to make a birthday card and these newly acquired stamps from Fiskars caught my eye. I'm not sure what happened to the color in the photo but it looks better in person; it's a little off in the photo. Also impossible to see is the glitter added to the party hat and present, but it shows up somewhat on the banner.

I'm entering this card into one challenge:
Simon Says Stamp Work It Wednesday Challenge: Cute.

Materials
Fiskars Lia Griffith Party Time Clear Stamps
Lawn Fawn Beam Me Up Stamps
Lawn Fawn Stitched Hillside Backdrop: Portrait Die

Various Ranger Distress Oxide Inks and Spectrum Noir markers (Sorry, I forgot to keep track of specific colors!)

Ranger Mini Ink Blending Tools
Spectrum Noir Clear Sparkle Glitter Pen (has a brush tip)
Designer Dries Clear Adhesive: 159723
Metal Tip for Adhesive Bottles: 352854

Other Materials
card: A2 size, blue gradient; alcohol marker paper in white; black dye ink pad; die cutting machine such as the Big Shot; Brother Scan N Cut2 or scissors; craft mat; and stamping tool such as the MISTI

Instructions
Use the Hillside Backdrop on white paper and run it through your die cutting machine. Ink up the main part of the backdrop with Distress Oxides in blue and green. Use various other colors for the tiny house and pine trees.

Stamp your car image onto the alcohol marker white paper. Mask off the car and stamp the doggie onto it. Remove the mask and stamp the tiny birthday hat and present from Beam Me Up. Stamp out the banner and the sentiment on the same paper. Run both through your Brother machine or fussy cut with scissors. Color with markers, add glitter, and glue everything down. Done!


Wednesday, November 14, 2018

Thankful for Friend

Yes, the text on the card is not even on purpose.
This card was made especially for a nature-loving friend of mine. I was a little sad the blueprints didn't show up very well, but if anyone can tell what the leaves are without needing to look them up, it's her. I am very thankful and grateful to have her in my life as a friend.

I'm entering this card into four challenges:
Simon Says Stamp Work It Wednesday Challenge October 2018: Give Thanks!
Simon Says Stamp Monday Challenge: Thanks/Thanksgiving
Simon Says Stamp Wednesday Challenge: Thanks/Thanksgiving
and Frilly and Funky Challenge: A Harvest of Gratitude.

Materials
Lawn Fawn Hello Friend Stamps
Lawn Fawn Jump for Joy Stamps
Tim Holtz - Stampers Anonymous Mini Autumn Blueprint Cling Stamps
Tim Holtz - Stampers Anonymous Great Outdoors CMS321
Prima Marketing, Inc. Cling Stamp #582678 wood grain design*(see warning below)

ZIG Clean Color Real Brush Watercolor Markers
• for Oak: 050 yellow, 070 orange, 052 bright yellow, 060 brown, and 029 geranium red
• for Birch: 053 yellow green, 051 lemon yellow, and 050 yellow
• for Maple: 060 brown, 022 carmine red, and 020 red
Ranger Distress Oxide Inks in: Antique Linen, Gathered Twigs, and Walnut Stain
Ranger Distress Ink in: Antique Linen
Colorbox Pigment Ink in Rose Gold
Wendy Vecchi Embossing Powder in Potting Soil
The Old World Mat Stack paper

Ranger Mini Ink Blending Tools
Tonic Studios - Tim Holtz Paper Distresser
Recollections Paper Flowers
Designer Dries Clear Adhesive: 159723
Metal Tip for Adhesive Bottles: 352854

*I would advise against trying to use this particular stamp. It has never produced a good impression when used with any type of stamping tool or stamp block, despite multiple attempts and much finagling. The only way I got this stamped was to take it off the stamping tool and mash down the center by hand.

Other Materials
card: A7 size, kraft; brown paper; watercolor paper; scissors; paper trimmer; craft mat; heat gun; stamping tool such as the MISTI; Scotch Advanced Tape Glider; and pop dots

Instructions
Starting with your kraft card, ink the edges with Gathered Twigs, lightening as you move inwards. Take a sheet of green-ish paper from The Old World Mat Stack and use the paper distresser on all four edges. Because of the way this paper tears, you may need to use it on both sides of the edge to get the desired effect. Go over the distressed edges with a blending tool and the Distress Oxide in Antique Linen.

On the brown sheet of paper, stamp the wood grain design in Rose Gold and cover with Potting Soil Embossing Powder. Shake off excess powder and melt the remaining powder with your heat gun. Trim to the edge of the stamp impression on the paper. Gently tear off two opposite edges to achieve the ragged effect in the final photo. On the remaining brown paper, stamp the tree cross-section in Walnut Stain and fussy cut out around the outer edge. (You can tell how much my friend means to me; I despise fussy cutting and usually avoid it as all costs, but tree cross-section!)

On the watercolor paper, use the Distress Ink in Antique Linen to stamp out the three leaves. Listed above are the colors for each leaf, in the approximate order that I used them. When the leaves are colored to your satisfaction, cut out each leaf blueprint and ink the edges with Distress Oxide Antique Linen.

Using either the ATG or glue, affix the green paper to the front of your card in the center, followed by the brown wood grain. Before adding other dimensional elements, figure the position your sentiment needs to be stamped in and use Distress Oxide Walnut Stain to do so. Inside the card stamp your preferred greeting also in Walnut Stain; I chose a stamp from the "Hello Friends" Lawn Fawn set (note that it is a retired stamp set). I was glad I used my stamping tool for that because it did take two tries to get the saturation I was looking for in the ink.

Use pop dots to affix the tree cross-section to the bottom right front of the card. Glue the leaves onto it next, and finish with gluing on the paper flowers. Give to someone who means a lot to you.

I kept the inside of the card simple.

Tuesday, October 30, 2018

A Wintery Thanks

When your paper sparkles more than the gemstones!
This is what happens when you can't sleep and get up to craft for a while instead.

I'm entering this card into three challenges:
Simon Says Stamp Blog's Work It Wednesday Challenge October 2018: Give Thanks!
Lawn Fawnatics Challenge 39 Bling It Out!
and My Favorite Things Wednesday Sketch Challenge - Sketch 408.

Materials
Lawn Fawn Scripty Thanks Die Lawn Fawn Stitched Snowflakes Die
Spellbinders Nestabilities Dies Standard Circle, SM: 3"
Style Steal Gemstones (from Michaels)
DCWV Inc. Glitzy Stack
Designer Dries Clear Adhesive: 159723
Metal Tip for Adhesive Bottles: 352854

Other Materials
card: A7 size, dark blue; paper trimmer; and a Big Shot or similar tool

Instructions
Use gold glitzy sparkle paper with the 3" circle die. From the silver glitzy sparkle paper cut two stripes the width of your card 5" long each, at a height that looks good to you. Use the remainder of the silver glitzy sparkle paper with the "thanks" and snowflake dies. When all of these are glued onto your card, add some clear gemstones for a final sparkly touch.

The template for this card from My Favorite Things Card Challenge Sketch 408.

Monday, October 1, 2018

"for you" Fall

Happy Fall!
I'm happy with how this card turned out! It looks so fall-like to me, and it required zero stamping. It's nice to take a break from using stamps now and then.

I'm entering this card into three challenges:
Simon Says Stamp Blog's Wednesday Challenge: Anything Goes
Lawn Fawnatics Challenge 38 Awesome Autumn
and Papercraft Business Challenge 11: October 2018; optional Halloween/Fall/Autumn.

Materials
Lawn Fawn Leafy Tree Backdrop: Portrait Die
Lawn Fawn Scripty For You Die
Lawn Fawn Stitched Hillside Borders Die
Lawn Fawn Stitched Windy Backdrop Die
Lawn Fawn Stitched Woodgrain Backdrop Die
Ranger Distress Oxide Inks in: Broken China, Candied Apple, Faded Jeans, Fossilized Amber, and Spiced Marmalade
Ranger Mini Ink Blending Tools
Designer Dries Clear Adhesive: 159723
Metal Tip for Adhesive Bottles: 352854

Other Materials
card: A2 size; white paper; brown paper; green patterned paper; paper cutter; water mister; and a Big Shot or similar tool

Instructions
Your first step is to run the sheet of brown paper through your die cutter with the Woodgrain Backdrop, and take the resulting sheet and send it through again with the Leafy Tree. Do the same for a white piece of paper and the Windy Backdrop, and a green patterned paper and the Hillside Borders.

Take the Broken China and Faded Jeans Distress Oxides and apply them to your white paper with the windy backdrop. Add and blend until you're happy with the results. Mist with water and gently dab to lighten the oxides.

Use the Fossilized Amber, Spiced Marmalade, and Candied Apple on a blank sheet of white paper, blending and mixing until you like the results. Run "for you", the leaf portion of the tree, and one set of leaves through your die cutting machine with this mixture of colors. If you're using the tree die cut flipped and with the tree on the right side of the paper as I did, remember to reverse the die on the sheet of autumn colors for your leaf portion of the tree, so the color ends up on the correct side when you go to glue it.

Use your paper cutter to trim the sky and ground to the dimensions of the card. The gluing order should be sky, ground and leaf part of tree, tree/border, and last sentiment and random leaves.

Monday, July 30, 2018

Travel: Follow Your Heart

A self-propelled method of travel!
This is my best vintage/shabby chic card yet!

I'm entering this card into two challenges:
Simon Says Stamp Blog's Wednesday Challenge: Anything Goes
and Frilly and Funkie: Planes, Trains, and Automobiles Challenge.

Materials
Molly & Rex Enjoy the Ride Stamps
Bo Bunny Love & Lace Buttons
Ranger Distress Oxide Inks in: Blueprint Sketch, Bundled Sage, Candied Apple, Faded Jeans, Fired Brick, Fossilized Amber, Frayed Burlap, Picked Raspberry, Salty Ocean, Spiced Marmalade, and Wilted Violet
Ranger Mini Ink Blending Tools
Fran Wilson Nail Tees
Designer Dries Clear Adhesive: 159723
Metal Tip for Adhesive Bottles: 352854

Other Materials
card: white, A2 size; Bo Bunny Provence Collection paper; Memento Black Dye Ink; paper cutter; water mister; and a MISTI or similar tool

Instructions
Starting with the blank card, use Frayed Burlap around the edges with a blending tool. Mist gently with water and pat dry. Using the paper cutter, trim your chosen patterned paper to slightly less than the size of the card front. Center and glue to the front of your card. Repeat the use of the Frayed Burlap, misting, and patting dry.

Stamp the bicycle with the black ink in your MISTI or equivalent stamp positioner, and color in using nail tees and distress oxide inks. (Nail tees are like Q-tips with a sharp pointed end.) Use the stamp positioner also for the sentiment in Candied Apple. In retrospect I should have used a darker color; I was trying for a match to the roses on the button and didn't make it. Before adhering the button to the card, add some Frayed Burlap around the edge and mist lightly. Pat dry and stick to card.

Monday, July 23, 2018

Enjoy the little things!


Peep!

Luckily Lawn Fawn has a ton of stamps with peeps! (Chicks.) This made mixing and matching easy for this card! Not pictured: chicks in party hats, chicks in wedding garb, chicks in scarves, etc.

I'm entering these cards into three challenges:
MFT Wednesday Sketch Challenge - Sketch 394,
MFT Color Challenge 97, and
Simon Says Stamp Wednesday Challenge: Use A Die and/or Punch.
 
Materials
Lawn Fawn Stamps: Critters on the Savana
Lawn Fawn Stamps: Village Shops
Lawn Fawn Stamps: Yay, Kites!
Lawn Fawn Stamps: Critters on the Farm
Lawn Fawn Stamps: Critters in the Forest
Lawn Fawn Dies: Mini Picture Frames
Memento Tuxedo Black Dye Ink
Distress Oxide in Abandoned Coral
Distress Oxide in Squeezed Lemonade
Distress Oxide in Carved Pumpkin
Ranger Mini Ink Blending Tool
Darice Embossing Folder: Scroll Background
Art Glitter: Designer Dries Clear Adhesive

Other Materials
white card base; four various patterned papers: paper cutter; detail sponge tool; MISTI-type stamping aid or stamp blocks; and die cutting machine (Example: the Big Shot)

Instructions
Start by embossing the front of your card base. Using the yellow first, blend distress oxide from the top down to about 2/3s of the way down the card. Start with orange and work your way up from the bottom to about halfway. Add a bit of coral to the orange, and blend in more yellow as needed.

Cut each of the four patterned papers using the Mini Picture Frames die. To save time, use the printed side of the frame and flip the inside over to use the white side. Stamp each of the peeps with black ink and color in using the yellow distress oxide and your detail sponge tool. Put a tiny bit of orange on each beak. Stamp out a sentiment from the Village Shops stamp set in coral on white paper; trim appropriately. Assemble and glue as seen. Peep!

MFT Wednesday Sketch Challenge 394.

MFT Color Challenge 97.

Tuesday, July 10, 2018

Red, White, and Blue Mini Milk Carton

Tiny milk carton!
These little milk cartons are so cute! I love miniatures and these little guys are all of about 3 inches tall. They're fun to fold too! If I could just figure out how to get them to work with magnets for a closure they'd be perfect.

I'm entering this papercrafting project into one challenge:
Simon Says Stamp Wednesday Challenge: Red, White, and/or Blue.
 
Materials
Spellbinders "More Than Milk Carton" Dies
Art Glitter: Designer Dries Clear Adhesive

Other Materials
assorted papers; 1 small clothespin; and a die-cutting machine: for example a Big Shot

Instructions
Use the Spellbinders dies to cut out the various papers and assemble as per the picture.

What the opening looks like.

Sunday, March 18, 2018

Shiny Flowers

Ooooo shiny!
I started my CAS (clean and simple) card kick with these cards, although this blog post is not first.

I'm entering these cards into two challenges:
Simon Says Stamp Monday Challenge: Easter/Spring Inspiration and
Simon Says Stamp Wednesday Challenge: Easter Inspired.
 
Materials
Snapdragon Snippets Silhouette Design #17704
Art Glitter: Designer Dries Clear Adhesive

Other Materials
metallic papers; gems; and Silhouette Cameo (in my case Cameo 3)

Instructions
In Silhouette Studio adjust the size of the design to your card base, and cut out all pieces. Add gems and glue to card. Send to people who love shiny things!

It's hard to get the lighting perfect with reflective cards.

Saturday, March 17, 2018

Bright and Sunny Wishes!

Sending bright and sunny wishes!
Right now I'm on a CAS (clean and simple) card kick. These two are my latest efforts. The embossed paper and various paper patterns keep these from being too boring. I think they'll do nicely at brightening up someone's day!

I'm entering these cards into two challenges:
MFT Wednesday Sketch Challenge - Sketch 376 and
Simon Says Stamp: Work it Wednesday February 2018.
 
Materials
Jillibean Soup Clear Stamps Sunshine
Jillibean Soup Large Circle Shaker Dies Set
Versamark Watermark Stamp Pad
Wendy Vecchi Embossing Powder in Sunflower
Art Glitter: Designer Dries Clear Adhesive

Other Materials
green card base; various papers: green embossed, green pattern, 3 yellow patterns; paper cutter; heating tool; and die cutting machine

Instructions
Start by die cutting two suns. Using Versamark I stamped the sentiment and added embossing powder. A quick bit of heating and the words were nice and shiny. Cut your paper to size, glue everything on going by the template, and you've got a CAS greeting card!

Template for MFT Wednesday Sketch Challenge - Sketch 376.

Monday, October 16, 2017

Penguin-ing to look like a gift card holder!

Christmas is coming up fast!
I'm entering this card into two challenges:
Lawn Fawnatics Challenge 15 – Clever Gift Packaging and
Simon Says Stamp: Work it Wednesday August/September 2017.
 
I must be a little rusty with my crafting skills; I made a few obvious mistakes with this one. But I like how it turned out overall. I used the gift card holder die from Lawn Fawn for the base, covered the bottom to keep it snowy, and blended Distress Oxide inks in Faded Jeans and Broken China for the sky. After removing the paper at the bottom, the snow background stamp from Lawn Fawn's "Snow Cool" was used with Colorbox White Pigment Ink and Recollections Pearl Embossing Powder in Snow, heated to set.

The penguins and sentiment are from Lawn Fawn's "Here We Go A-Waddling". I stamped them on white cardstock with Memento Dye Ink in Tuxedo Black. The colors used for the penguins were Spectrum Noir True Black, GY4, DR3. and LG5. After cutting them out, I glued them on and stamped the sentiment in Colorbox Pigment Ink in Archival Black. Because I didn't use my MISTI, I couldn't re-stamp when it didn't take well the first time. I still added Recollections Detail Embossing Power in Ebony and headed to set it. A little glue on the tabs and it's ready to go.

Before gluing up.

Tuesday, July 11, 2017

Summertime!

Summertime!
I'm entering this card into two challenges:
Simon Says Stamp Wednesday Challenge: Summer Sunshine and
Simon Says Stamp Work It Wednesday June 2017: Summer Icons.
 
After planning and executing a move across state, I am getting back into crafting! Unfortunately the first thing I packed and the last thing I unpacked was my papercrafting supplies, and life has also interfered with my crafting time.

I decided to keep this one clean and simple, and it was a test of several new supplies. This was my first test of the Tim Holtz Distress Oxide Ink Pads, for the center of the sun. I also tried out my Pixscan mat for the Silhouette Cameo 3. Neither turned out perfect but I think with a little more work they'll really shine (no pun intended!)

Sunday, March 19, 2017

Thursday, March 9, 2017

Jillibean Soup Birthday Mock Shaker Card

My original thought was to make the gumballs in the machine a little 3-D with pop dots and leave them loose, but they kept flipping over in the shaker. So this turned out to be a mock shaker card as I ended up gluing them down.

I'm entering this card into one challenge:
Simon Says Stamp Monday Challenge: Make Your Own Background.

Materials
Jillibean Soup Clear Stamps Sweet Treat
Jillibean Soup Small Circle Die Cut Shaker Card
Jillibean Soup Small Circle Shaped Shaker

Other Materials
pop dots; white cardstock; embossing heat tool; Versamark ink pad; Wendy Vecchi Embossing Powder in Red Geranium; Memento Dye Ink in Love Letter, Tangelo, Dandelion, Bamboo Leaves, Danube Blue, and Grape Jelly; masking paper or pen (having neither, I resorted to using Post-it notes); and a MISTI

Instructions
Start with the Versamark and stamp the gumball machine and sentiment. Dust with embossing power and heat set. Mask the gumball machine with whichever method you choose, and use the various Memento Inks to stamp a gumball background. With the same inks, stamp some gumballs on white cardstock and fussy cut them out. Remove the masks from the gumball machine. Line up the gumballs with the opening in the front of the card and pop dot them to the back of the card. Add the shaker plastic and you're set!


Tuesday, March 7, 2017

"Darn Amazing" Butterfly Stamp Card


I tried for colors as close to the given challenge colors as I could get, but I didn't quite make it. Clearly this means my crafting stash isn't big enough yet! ^_~  This particular card is full of shimmer and sparkles, but sadly those never photograph too well. The only exception to the shimmer or sparkle is the outer border of flowers, which is plain.

I'm entering this card into two challenges:
MFT Wednesday Sketch Challenge - Sketch 322
MFT Color Challenge 64.

Materials
Sizzix Framelits Die Set with Stamps Limitations by Tim Holtz
Avery Elle Clear Stamp Set: Simply Said
Designer Dries Clear Adhesive: 159723
Metal Tip for Adhesive Bottles: 352854

Other Materials
pop dots; shimmer cardstock: black, gray, and light yellow; patterned paper with flowers; card: A7 ivory shimmer; Spectrum Noir Clear Sparkle Pen; Tsukineko Pearlescent Sky Blue - Brilliance Pigment Ink; Colorbox Archival Dye in Wicked Black; Sizzex Big Kick; Scotch Advanced Tape Glider (ATG) with Acid Free tape; embossing heat tool; cutting tool (I used my Silhouette but even an Exacto would work); and a MISTI

Instructions
Cut the patterned paper to 5" by 7"; cut a rectangular hole in the middle half an inch from each side. You can use the inner rectangle to cut the banner strip of patterned paper. Cut the gray shimmer cardstock to 4" by 6", again with a rectangular hole in the center, leaving a thin border of shimmer gray. Cut some of the black shimmer cardstock to a 5" by 2" piece.

Stamp the butterfly with the blue ink and use the heat tool to dry. Die cut the butterfly. Stamp your choice of words on the banner strip of paper using the black ink, and trim the end to a fetching arrowhead. Swipe the banner strip with a sparkle pen.

Glue the patterned rectangle on your card first. Next glue the black rectangle, then the gray border. Add the banner strip to the top of these with pop dots, and use pop dots to adhere your butterfly. I seem to be addicted to using pop dots; I love the dimension they add to any piece!

Another angle in an attempt to show the shimmer!

Monday, February 27, 2017

Art-C Butterflies Tropical Card


I have to admit, vintage and shabby chic are a HUGE challenge for me. I'm so fond of shiny and new, it's really hard to make a card look old or worn on purpose. However, I gave it my best shot this time around, and at this time of year, an awful lot of us here are dreaming of someplace warmer!

I'm entering this card into three challenges:
Simon Says Stamp Blog's Wednesday Challenge: Anything Goes
MFT Wednesday Sketch Challenge - Sketch 321
and Frilly and Funkie: Out of the Cold Challenge.

Materials
Art-C Stamp and Cut Butterflies
Cricut Design Space: Flower #M31CA4
Avery Elle Clear Stamp Set - Pegasus Duo
K & Company Tim Coffey Travel Specialty Paper Pad 12"x12": palm trees page
Core'dinations Tim Holtz & Ranger Distress Collection: 5 colors
DCWV The Old World Stack Textured: green patterned
Designer Dries Clear Adhesive: 159723
Metal Tip for Adhesive Bottles: 352854

Other Materials
pop dots; card: ivory, A7 size; Colorbox Pigment Ink in Espresso; Sizzex Big Kick; Scotch Advanced Tape Glider (ATG) with Acid Free tape; paper cutter; embossing heat tool; a Cricut; and a MISTI

Instructions
Start in the Cricut Design Space with Flower #M31CA4. The flower has two extraneous dots on it I didn't like; add a shape to that cut layer and weld to get rid of them. Resize the flower so it's just under 4" square. Using all but the largest background layer, cut each of the remaining six layers on separate colors of paper, using appropriate colors for the flower, leaves, and the patterned paper for the background. I suggest cutting the background out first and gluing the various pieces on it as you cut them out. This is easier than leaving them all until the end, although this flower's background has excellent guide marks once it's cut out should you choose to wait to glue it together.

Still in the Design Space, insert an octagon shape, duplicate it, size the second octagon slightly smaller than the first, align horizontally and vertically, and use slice. Save only the outline image. Size it to just under 4" by 4" and align to a corner of the grid lines placed about how you want to see it on the card, with the bottom right corner overlapping the grid lines. Insert a square that overlaps the octagon on one side of the grid lines and use slice. Save only the octagon outline with a part missing. Repeat with a second square on the grid lines perpendicular to the first set you used. Slice and save only the part that will now be the chopped outline on your card.

You'll need to use this template twice: once on the palm trees paper to form the card background, (leaving you with a thin octagon outline you can discard), and once on the patterned green paper used for the octagon, this time saving the thin outline. Once you've cut the octagon from the palm trees paper, use your paper cutter to trim it to 5" wide by 5.5" tall, making sure to line this up with the octagon in the lower right-hand corner.

Cut a colored strip of paper to 1.5" by 5" for the bottom of your card, and another strip in the patterned green to 1" by 5". Stamp your sentiment on the patterned green paper with Espresso ink. Stamp three butterflies with the same ink, one on each of the two brightest flower colors and one on a scrap of the palm tree paper. Use an embossing heat tool to set the ink on all four of these, and die cut the butterflies.

Now comes the easiest part: assembly! Start with the palm tree background and use the ATG to adhere it even to the upper edge of the card. Next adhere the 1.5" by 5" strip to the remaining space at the bottom of the card, and the 1" by 5" strip along the bottom edge on top of it. Glue the octagon edge around its open space in the card, and add the flower on top of it. Pop dot the three butterflies onto the card and you'll have a little taste of the tropics.

Sunday, February 26, 2017

Molly & Rex - Enjoy the Ride


Enjoy the ride!

This is a really simple card, but pretty. It was fun to make too.

I'm entering this card into two challenges:
Simon Says Stamp Blog's Monday Challenge: Transport It
Simon Says Stamp Blog's Wednesday Challenge: Anything Goes.

Materials
Molly & Rex: Enjoy the Ride Stamps
Designer Dries Clear Adhesive: 159723
Metal Tip for Adhesive Bottles: 352854

Other Materials
neon cardstock: red, pink, yellow, fuchsia, and orange; card: green-to-white gradient; Spectrum Noir Alcohol Markers (I used eight or ten different colors but I mixed them up before I remembered to record them, sorry!); Recollections mini butterfly punch; Memento Dye Ink in Bamboo Leaves; Colorbox Archival Dye in Wicked Black; and a MISTI

Instructions
Use the black dye and stamp the green-to-white gradient cardstock with the bicycle; color in with markers. Stamp "enjoy the ride" on the opposite corner with the green ink. Punch out three butterflies from each neon color and glue in place. Enjoy the card!

Paper Smooches - Best Buds Cards Cont'd.


I've been keeping busy. On a kick with the sea green and coral colors, I used some of the same elements as the last posted card to make a few derivatives for sale. The cards below will be available at the Oak Park Women's Exchange in a couple weeks. (See the OPWE website for more info!)

Materials
Paper Smooches: Best Buds Stamps
Paper Smooches: Best Buds Icons Dies
Designer Dries Clear Adhesive: 159723
Metal Tip for Adhesive Bottles: 352854

Other Materials
See previous post for most of other the materials.

Instructions
Similar to previous post.

Sending hugs!
Wishing you brighter days ahead!
Thanks a lot!